How Do I Get Started With Bug Bounty ?

How do I get started with bug bounty hunting? How do I improve my skills?


These are some simple steps that every bug bounty hunter can use to get started and improve their skills:

Learn to make it; then break it!
A major chunk of the hacker's mindset consists of wanting to learn more. In order to really exploit issues and discover further potential vulnerabilities, hackers are encouraged to learn to build what they are targeting. By doing this, there is a greater likelihood that hacker will understand the component being targeted and where most issues appear. For example, when people ask me how to take over a sub-domain, I make sure they understand the Domain Name System (DNS) first and let them set up their own website to play around attempting to "claim" that domain.

Read books. Lots of books.
One way to get better is by reading fellow hunters' and hackers' write-ups. Follow /r/netsec and Twitter for fantastic write-ups ranging from a variety of security-related topics that will not only motivate you but help you improve. For a list of good books to read, please refer to "What books should I read?".

Join discussions and ask questions.
As you may be aware, the information security community is full of interesting discussions ranging from breaches to surveillance, and further. The bug bounty community consists of hunters, security analysts, and platform staff helping one and another get better at what they do. There are two very popular bug bounty forums: Bug Bounty Forum and Bug Bounty World.

Participate in open source projects; learn to code.
Go to https://github.com/explore or https://gitlab.com/explore/projects and pick a project to contribute to. By doing so you will improve your general coding and communication skills. On top of that, read https://learnpythonthehardway.org/ and https://linuxjourney.com/.

Help others. If you can teach it, you have mastered it.
Once you discover something new and believe others would benefit from learning about your discovery, publish a write-up about it. Not only will you help others, you will learn to really master the topic because you can actually explain it properly.

Smile when you get feedback and use it to your advantage.
The bug bounty community is full of people wanting to help others so do not be surprised if someone gives you some constructive feedback about your work. Learn from your mistakes and in doing so use it to your advantage. I have a little physical notebook where I keep track of the little things that I learnt during the day and the feedback that people gave me.


Learn to approach a target.
The first step when approaching a target is always going to be reconnaissance — preliminary gathering of information about the target. If the target is a web application, start by browsing around like a normal user and get to know the website's purpose. Then you can start enumerating endpoints such as sub-domains, ports and web paths.

A woodsman was once asked, "What would you do if you had just five minutes to chop down a tree?" He answered, "I would spend the first two and a half minutes sharpening my axe."
As you progress, you will start to notice patterns and find yourself refining your hunting methodology. You will probably also start automating a lot of the repetitive tasks.

Continue reading


  1. Herramientas Hacking Android
  2. Hacking Marketing
  3. Growth Hacking Definicion
  4. Hacking Significado
  5. Herramientas Hacking
  6. Hacking Academy
  7. Hacker Blanco
  8. Hacking Life
  9. Hacking To The Gate Lyrics
  10. Geekprank Hacking

BruteSpray: A Brute-forcer From Nmap Output And Automatically Attempts Default Creds On Found Services


About BruteSpray: BruteSpray takes nmap GNMAP/XML output or newline seperated JSONS and automatically brute-forces services with default credentials using Medusa. BruteSpray can even find non-standard ports by using the -sV inside Nmap.

BruteSpay's Installation
   With Debian users, the only thing you need to do is this command:
sudo apt install brutespray

   For Arch Linux user, you must install Medusa first: sudo pacman -S medusa

   And then, enter these commands to install BruteSpray:


Supported Services: ssh, ftp, telnet, vnc, mssql, mysql, postgresql, rsh, imap, nntpp, canywhere, pop3, rexec, rlogin, smbnt, smtp, svn, vmauthdv, snmp.

How to use BruteSpray?

   First do an Nmap scan with -oG nmap.gnmap or -oX nmap.xml.
   Command: python3 brutespray.py -h
   Command: python3 brutespray.py --file nmap.gnmap
   Command: python3 brutesrpay.py --file nmap.xml
   Command: python3 brutespray.py --file nmap.xml -i

   You can watch more details here:

Examples

   Using Custom Wordlists:
python3 brutespray.py --file nmap.gnmap -U /usr/share/wordlist/user.txt -P /usr/share/wordlist/pass.txt --threads 5 --hosts 5

   Brute-Forcing Specific Services:
python3 brutespray.py --file nmap.gnmap --service ftp,ssh,telnet --threads 5 --hosts 5

   Specific Credentials:
python3 brutespray.py --file nmap.gnmap -u admin -p password --threads 5 --hosts 5

   Continue After Success:
python3 brutespray.py --file nmap.gnmap --threads 5 --hosts 5 -c

   Use Nmap XML Output:
python3 brutespray.py --file nmap.xml --threads 5 --hosts 5

   Use JSON Output:
python3 brutespray.py --file out.json --threads 5 --hosts 5

   Interactive Mode: python3 brutespray.py --file nmap.xml -i

Data Specs
{"host":"127.0.0.1","port":"3306","service":"mysql"}
{"host":"127.0.0.10","port":"3306","service":"mysql"}
...


Changelog: Changelog notes are available at CHANGELOG.md.

You might like these similar tools:

Related posts


  1. Como Ser Hacker
  2. Cracker Definicion
  3. Body Hacking
  4. Libro Hacker
  5. El Mejor Hacker
  6. Amiibo Hacking
  7. Live Hacking
  8. Hacking Pdf
  9. Diferencia Entre Hacker Y Cracker

wpCrack - Wordpress Hash Cracker


Wordpress Hash Cracker.

Installation
git clone https://github.com/MrSqar-Ye/wpCrack.git


Video


Related word

How To Start PHP And MYSQL | The Best Server For PHP And MYSQL | Tutorial 1


Many of people want to start PHP programming embedded with MYSQL databases concepts. So i thought that I should start a series about PHP and MYSQL. So in this series of video tutorials you exactly got the content about PHP and MYSQL.

As PHP is server side scripting language. So it requires a server to get execute over the web browser. First of all you have to download and install a server that may be XAMPP, WAMPP or LAMPP. I'm using XAMPP server in the tutorials. So if you wanna follow me then download a XAMPP server. I'm using this because it has a good interface to work  and it's really simple. XAMPP is compatible with windows, MAC and Linux operating as well. WAMPP is only for windows and LAMPP is used for MAC and Linux operating system. So i prefer XAMPP for this series.

How to create Database

Step 1:

Open Your XAMPP control panel and start Apache and Mysql services.

Step 2:

Go to your Web browser and type "localhost/phpmyadmin". It will open your databases area. If you have an error then your services are not in running state. If you have any error then comment below.

Step 3:

Click over the "new" to create a new database.

Step 4:

Write Database_Name and click over the Create button. For example Facebook, Students etc.

Step 5:

Write Table_Name like admin, users etc. your can increase and decrease the size of rows. Click over Save/Create button.

Step 6:

Write your Attribute_Names in first column like Username, Email, Passwords etc. In the next data type column you have to select the data type whether it is integer or string type etc. In the next column you have to set the length of string/words.

Step 7:

If you wanna go through with a Primary_Key. Then just you have to checked the Auto_Increment box as you will shown in the video. For further watch the video for better understanding. 

Enter the command ipconfig. You will get results similar to the ones shown below

Ultimate guide to DoS(Denial of Service) Attacks

For this example, we are using Mobile Broadband connection details. Take note of the IP address. Note: for this example to be more effective, and you must use a LAN network.

 Switch to the computer that you want to use for the attack and open the command prompt

We will ping our victim computer with infinite data packets of 65500

Enter the following command

ping 10.128.131.108 –t |65500

HERE,

  • "ping" sends the data packets to the victim
  • "10.128.131.108" is the IP address of the victim
  • "-t" means the data packets should be sent until the program is stopped
  • "-l" specifies the data load to be sent to the victim

You will get results similar to the ones shown below

Ultimate guide to DoS(Denial of Service) Attacks

Flooding the target computer with data packets doesn't have much effect on the victim. In order for the attack to be more effective, you should attack the target computer with pings from more than one computer.

The above attack can be used to attacker routers, web servers etc.

If you want to see the effects of the attack on the target computer, you can open the task manager and view the network activities.

  • Right click on the taskbar
  • Select start task manager
  • Click on the network tab
  • You will get results similar to the following

Ultimate guide to DoS(Denial of Service) Attacks

If the attack is successful, you should be able to see increased network activities.


Hacking Activity: Launch a DOS attack

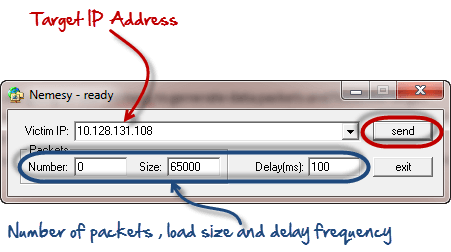
In this practical scenario, we are going to use Nemesy to generate data packets and flood the target computer, router or server.

As stated above, Nemesy will be detected as an illegal program by your anti-virus. You will have to disable the anti-virus for this exercise.

Ultimate guide to DoS(Denial of Service) Attacks

Enter the target IP address, in this example; we have used the target IP we used in the above example.

HERE,

  • 0 as the number of packets means infinity. You can set it to the desired number if you do not want to send, infinity data packets
  • The size field specifies the data bytes to be sent and the delay specifies the time interval in milliseconds.


Click on send button

You should be able to see the following results

Ultimate guide to DoS(Denial of Service) Attacks

The title bar will show you the number of packets sent

Click on halt button to stop the program from sending data packets.

You can monitor the task manager of the target computer to see the network activities.

Summary

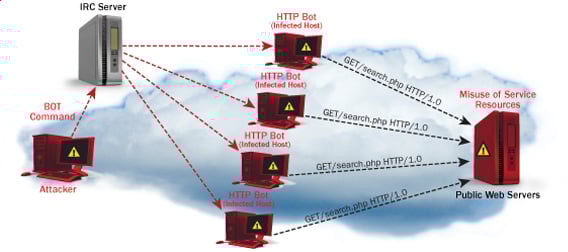
  • A denial of service attack's intent is to deny legitimate users access to a resource such as a network, server etc.
  • There are two types of attacks, denial of service and distributed denial of service.
  • A denial of service attack can be carried out using SYN Flooding, Ping of Death, Teardrop, Smurf or buffer overflow
  • Security patches for operating systems, router configuration, firewalls and intrusion detection systems can be used to protect against denial of service attacks.
@EVERYTHING NT
Related articles
  1. Fake Hacking
  2. Black Hacker
  3. Hacking Websites
  4. Hacker Profesional
  5. Hacking Wifi Windows
  6. Hacker Definicion
  7. Hacking Netflix Account
  8. Certificacion Hacking Etico
  9. Hacking Y Forensic Desarrolle Sus Propias Herramientas En Python Pdf
  10. Como Ser Un Buen Hacker
  11. Reddit Hacking
  12. Curso De Hacker Gratis Desde Cero
  13. Libros Para Aprender A Hackear

TorghostNG: Make All Your Internet Traffic Anonymized With Tor Network

About TorghostNG
   TorghostNG is a tool that make all your internet traffic anonymized with Tor network. TorghostNG is rewritten from TorGhost with Python 3.

   TorghostNG was tested on:
  • Kali Linux 2020a
  • Manjaro
  • ...

What's new in TorghostNG 1.2

Before you use TorghostNG
  • For the goodness of Tor network, BitTorrent traffic will be blocked by iptables. Although you can bypass it with some tweaks with your torrent client 😥 It's difficult to completely block all torrent traffic.
  • For security reason, TorghostNG is gonna disable IPv6 to prevent IPv6 leaks (it happened to me lmao).

Screenshots of Torghost (Version 1.0)
   Connecting to Tor exitnode in a specific country: torghostng -id COUNTRY ID

   Changing MAC address: torghostng -m INTERFACE

   Checking IP address: torghostng -c

   Disconnecting from Tor: torghostng -x

   Uninstalling TorghostNG: python3 install.py

Installing TorghostNG
   TorghostNG installer currently supports:
  • GNU/Linux distros that based on Arch Linux
  • GNU/Linux distros that based on Debian/Ubuntu
  • GNU/Linux distros that based on Fedora, CentOS, RHEL, openSUSE
  • Solus OS
  • Void Linux
  • Anh the elder guy: Slackware
  • (Too much package managers for one day :v)

   To install TorghostNG, open your Terminal and enter these commands:
   But with Slackware, you use sudo python3 torghostng.py to run TorghostNG :v

Help
    You can combine multiple choices at the same time, such as:
  • torghostng -s -m INTERFACE: Changing MAC address before connecting
  • torghostng -c -m INTERFACE: Checking IP address and changing MAC address
  • torghostng -s -x: Connecting to Tor anh then stop :v
  • ...
   If you have any questions, you can watch this tutorial videos 🙂
   I hope you will love it 😃

How to update TorghostNG
   Open Terminal and type sudo torghostng -u with sudo to update TorghostNG, but it will download new TorghostNG to /root, because you're running it as root. If you don't like that, you can type git pull -f and sudo python3 install.py.

Notes before you use Tor
   Tor can't help you completely anonymous, just almost:
   It's recommended that you should use NoScript before before surfing the web with Tor. NoScript shall block JavaScript/Java/Flash scripts on websites to make sure they won't reveal your real identify.

And please
  • Don't spam or perform DoS attacks with Tor. It's not effective, you will only make Tor get hated and waste Tor's money.
  • Don't torrent over Tor. If you want to keep anonymous while torrenting, use a no-logs VPN please.
   Bittorrent over Tor isn't a good idea
   Not anonymous: attack reveals BitTorrent users on Tor network

Changes log
   Version 1.2
  • Fixed update_commands and others in torghostng.py
  • Changed a few things in theme.py
  • Changed a few things in install.py
  • Now you can change Tor circuit with -r
   Version 1.1
  • Check your IPv6
  • Change all "TOR" to "Tor"
  • Block BitTorrent traffic
  • Auto disable IPv6 before connecting to Tor

Contact to the coder

To-do lists:
  • Block torrent, for you - Tor network (Done 😃)
  • Connect to IPv6 relays (maybe?)
  • GUI version
  • Fix bug, improve TorghostNG (always)

And finally: You can help me by telling me if you find any bugs or issues. Thank you for using my tool 😊

Continue reading

DMitry: Deepmagic Information Gathering Tool


"DMitry (Deepmagic Information Gathering Tool) is a UNIX/(GNU)Linux Command Line Application coded in C. DMitry has the ability to gather as much information as possible about a host. Base functionality is able to gather possible subdomains, email addresses, uptime information, tcp port scan, whois lookups, and more." read more...


Download: http://packetstormsecurity.org/UNIX/misc/DMitry-1.2a.tar.gz

Related links

  1. Fake Hacking
  2. Hackers Informaticos Contactar
  3. Growth Hacking Cursos
  4. Quiero Ser Hacker
  5. Growth Hacking Tools
  6. Hacking Books
  7. Manual Del Hacker
  8. Hacking Traduccion
  9. Live Hacking
  10. Aprender A Ser Hacker
  11. Hacking Wifi Android
  12. Hacking Attacks
  13. Hacking Social

Linux Command Line Hackery Series - Part 4


Welcome back to Linux Command Line Hackery, hope you have enjoyed this series so far. Today we are going to learn new Linux commands and get comfortable with reading text files on Linux.

Suppose that you wanted to view your /etc/passwd file. How will you do that? From what we have learned so far what you'll do is type:

cat /etc/passwd

And there you go, but really did you see all the output in one terminal? No, you just ended up with last few lines and you'll have to cheat (i,e use graphical scroll bar) in order to see all the contents of /etc/passwd file. So is there a command line tool in linux with which we can see all the contents of a file easily without cheating? Yes, there are actually a few of them and in this article we'll look at some common ones.

Command: more
Syntax:  more [options] file...
Function: more is a filter for paging through text one screenful at a time. With more we can parse a file one terminal at a time or line by line. We can also go backward and forward a number of lines using more.

So if we're to use more on /etc/passwd file how will we do that? We'll simply type

more /etc/passwd

now we'll get a screenful output of the file and have a prompt at the bottom of terminal. In order to move forward one line at a time press <Enter Key>. Using enter we can scroll through the file one line at a time. If you want to move one screen at a time, you can press <Space Key> to move one screen at a time. There are more functions of more program, you can know about them by pressing <h key>. To exit out of more program simply type <q key> and you'll get out of more program.

Command: less
Syntax: less [options] file...
Function: less is similar to more but less has more functionality than more. less is particularly useful when reading large files as less does not have to read the entire input file before starting, so it starts up quickly than many other editors.

less command is based on more so what you've done above with more can be done with less as well. Try it out yourself.

Command: head
Syntax: head [OPTION]... [FILE]...
Function: head command prints the head or first part of a file. By default head prints out first 10 lines of a file. If more than one file is specified, head prints first 10 lines of all files as a default behavior.

If we want to see only first 10 lines of /etc/passwd we can type:

head /etc/passwd

We can also specify to head how many lines we want to view by using the -n flag. Suppose you want to see first 15 lines of /etc/passwd file you've to type:

head -n 15 /etc/passwd

Ok you can view the first lines of a file what about last lines, is there a tool for that also? Exactly that's what our next command will be about.

Command: tail
Syntax: tail [OPTION]... [FILE]...
Function: tail is opposite of head. It prints the last 10 lines of a file by default. And if more than one file is specified, tail prints last 10 lines of all files by default.

To view last 10 lines of /etc/passwd file you'll type:

tail /etc/passwd

and as is the case with head -n flag can be used to specify the number of lines

tail -n 15 /etc/passwd

Now one more thing that we're going to learn today is grep.

Command: grep
Syntax: grep [OPTIONS] PATTERN [FILE...]
Function: grep is used to search a file for lines matching the pattern specified in the command.

A PATTERN can simply be a word like "hello" or it can be a regular expression (in geek speak regex). If you aren't familiar with regex, it's ok we'll not dive into that it's a very big topic but if you want to learn about it I'll add a link at the end of this article that will help you get started with regex.

Now back to grep say we want to find a line in /etc/passwd file which contains my user if we'll simply type:

grep myusername /etc/passwd

Wohoo! It gives out just that data that we're looking for. Remember here myusername is your username.
One cool flag of grep is -v which is used to look in file for every line except the line containing the PATTERN specified after -v [it's lowercase v].

Take your time practicing with these commands especially grep and more. We'll learn a lot more about grep in other upcoming articles.

References:
https://en.wikipedia.org/wiki/Regular_expression
http://www.regular-expressions.info/
Awesome website to learn Regular expressions - http://www.regexr.com/

Related articles


Fragroute


"fragroute intercepts, modifies, and rewrites egress traffic destined for a specified host, implementing most of the attacks described in the Secure Networks "Insertion, Evasion, and Denial of Service: Eluding Network Intrusion Detection" paper of January 1998. It features a simple ruleset language to delay, duplicate, drop, fragment, overlap, print, reorder, segment, source-route, or otherwise monkey with all outbound packets destined for a target host, with minimal support for randomized or probabilistic behaviour. This tool was written in good faith to aid in the testing of network intrusion detection systems, firewalls, and basic TCP/IP stack behaviour." read more...

Website: http://monkey.org/~dugsong/fragroute

Read more


Thousand Ways To Backdoor A Windows Domain (Forest)

When the Kerberos elevation of privilege (CVE-2014-6324 / MS14-068) vulnerability has been made public, the remediation paragraph of the following blog post made some waves:
http://blogs.technet.com/b/srd/archive/2014/11/18/additional-information-about-cve-2014-6324.aspx

"The only way a domain compromise can be remediated with a high level of certainty is a complete rebuild of the domain."

Personally, I agree with this, but .... But whether this is the real solution, I'm not sure. And the same applies to compromised computers. When it has been identified that malware was able to run on the computer (e.g. scheduled scan found the malware), there is no easy way to determine with 100% certainty that there is no rootkit on the computer. Thus rebuilding the computer might be a good thing to consider. For paranoids, use new hardware ;)

But rebuilding a single workstation and rebuilding a whole domain is not on the same complexity level. Rebuilding a domain can take weeks or months (or years, which will never happen, as the business will close before that).

There are countless documented methods to backdoor a computer, but I have never seen a post where someone collects all the methods to backdoor a domain. In the following, I will refer to domain admin, but in reality, I mean Domain Admins, Enterprise Admins, and Schema Admins.


Ways to backdoor a domain

So here you go, an incomplete list to backdoor a domain:

  • Create a new domain admin user. Easy to do, easy to detect, easy to remediate
  • Dump password hashes. The attacker can either crack those or just pass-the-hash. Since KB2871997, pass-the-hash might be trickier (https://technet.microsoft.com/library/security/2871997), but not impossible. Easy to do, hard to detect, hard to remediate - just think about service user passwords. And during remediation, consider all passwords compromised, even strong ones.
  • Logon scripts - modify the logon scripts and add something malicious in it. Almost anything detailed in this post can be added :D
  • Use an already available account, and add domain admin privileges to that. Reset its password. Mess with current group memberships - e.g. http://www.exploit-db.com/papers/17167/
  • Backdoor any workstation where domain admins login. While remediating workstations, don't forget to clean the roaming profile. The type of backdoor can use different forms: malware, local admin, password (hidden admin with 500 RID), sticky keys, etc.
  • Backdoor any domain controller server. For advanced attacks, see Skeleton keys 
  • Backdoor files on network shares which are commonly used by domain admins by adding malware to commonly used executables - Backdoor factory
  • Change ownership/permissions on AD partitions - if you have particular details on how to do this specifically, please comment
  • Create a new domain user. Hide admin privileges with SID history. Easy to do, hard to detect, easy to remediate - check Mimikatz experimental for addsid
  • Golden tickets - easy to do, hard to detect, medium remediation
  • Silver tickets - easy to do, hard to detect, medium/hard remediation
  • Backdoor workstations/servers via group policy
    • HKEY_LOCAL_MACHINE\ Software\ Microsoft\ Windows\ CurrentVersion\ RunOnce,
    • scheduled tasks (run task 2 years later),
    • sticky-keys with debug
  • Backdoor patch management tool, see slides here
[Update 2017.01.10]


Other tricks

The following list does not fit in the previous "instant admin" tips, but still, it can make the attackers life easier if their primary foothold has been disabled:

  • Backdoor recent backups - and when the backdoor is needed, destroy the files, so the files will be restored from the backdoored backup
  • Backdoor the Exchange server - get a copy of emails
  • Backdoor workstation/server golden image
  • Change permission of logon scripts to allow modification later
  • Place malicious symlinks to file shares, collect hashes via SMB auth tries on specified IP address, grab password hashes later
  • Backdoor remote admin management e.g. HP iLO - e.g. create new user or steal current password
  • Backdoor files e.g. on shares to use in SMB relay
  • Backdoor source code of in-house-developed software
  • Use any type of sniffed or reused passwords in new attacks, e.g. network admin, firewall admin, VPN admin, AV admin, etc.
  • Change the content of the proxy pac file (change browser configuration if necessary), including special exception(s) for a chosen domain(s)  to use proxy on malicious IP. Redirect the traffic, enforce authentication, grab password hashes, ???, profit.
  • Create high privileged users in applications running with high privileges, e.g. MSSQL, Tomcat, and own the machine, impersonate users, grab their credentials, etc. The typical pentest path made easy.
  • Remove patches from servers, change patch policy not to install those patches.
  • Steal Windows root/intermediate CA keys
  • Weaken AD security by changing group policy (e.g. re-enabling LM-hashes)
Update [2015-09-27]: I found this great presentation from Jakob Heidelberg. It mentions (at least) the following techniques, it is worth to check these:
  • Microsoft Local Administrator Password Solution
  • Enroll virtual smart card certificates for domain admins

Forensics

If you have been chosen to remediate a network where attackers gained domain admin privileges, well, you have a lot of things to look for :)

I can recommend two tools which can help you during your investigation:

Lessons learned

But guess what, not all of these problems are solved by rebuilding the AD. One has to rebuild all the computers from scratch as well. Which seems quite impossible. When someone is creating a new AD, it is impossible not to migrate some configuration/data/files from the old domain. And whenever this happens, there is a risk that the new AD will be backdoored as well.

Ok, we are doomed, but what can we do? I recommend proper log analysis, analyze trends, and detect strange patterns in your network. Better spend money on these, than on the domain rebuild. And when you find something, do a proper incident response. And good luck!

Ps: Thanks to Andrew, EQ, and Tileo for adding new ideas to this post.

Check out the host backdooring post as well! :)
Related links

  1. Nivel Basico
  2. Aprender A Ser Hacker
  3. Como Ser Un Buen Hacker
  4. Hacking Etico Libro
  5. Manual Del Hacker
  6. Libros Hacking

Medusa: A Speedy, Parallel And Modular Login Brute-forcing Tool


About Medusa
   Medusa is a speedy, parallel, and modular, login brute-forcer. The goal is to support as many services which allow remote authentication as possible. The author considers following items as some of the key features of this application:

   Thread-based parallel testing. Brute-force testing can be performed against multiple hosts, users or passwords concurrently.

   Flexible user input. Target information (host/user/password) can be specified in a variety of ways. For example, each item can be either a single entry or a file containing multiple entries. Additionally, a combination file format allows the user to refine their target listing.

   Modular design. Each service module exists as an independent .mod file. This means that no modifications are necessary to the core application in order to extend the supported list of services for brute-forcing.

   Multiple protocols supported. Many services are currently supported (e.g. SMB, HTTP, MS-SQL, POP3, RDP, SSHv2, among others).

   See doc/medusa.html for Medusa documentation. For additional information:

Building on macOS

#getting the source
git clone https://github.com/jmk-foofus/medusa
cd medusa

#macOS dependencies
brew install freerdp
$ export FREERDP2_CFLAGS='-I/usr/local/include'
$ export FREERDP2_LIBS='-I/usr/local/lib/freerdp'

#building
./configure
make

#executing

./src/medusa
Medusa's Installation
   Medusa is already installed on Kali Linux, Parrot Security OS, BlackArch and any other Linux distros based for security pentesting purposes.

   For Debian-based distro users, open your Terminal and enter this command:
sudo apt install medusa

   For Arch Linux-based distro users, enter this command: sudo pacman -S medusa

About the author:

You might like these similar tools:
Related articles
  1. Hacking Code
  2. Start Hacking
  3. Curso Completo De Hacking Ético
  4. Como Hacker
  5. Certificacion Ethical Hacking
  6. Hacking Marketing
  7. Hacking News
  8. Aprender Hacking Etico
  9. Hacking Prank
  10. Hacking Mifare
  11. Wifi Hacking
  12. Live Hacking
  13. Sean Ellis Growth Hacking
  14. Hacking Linux
  15. Tools Hacking
  16. Growth Hacking Examples